Add description, images, menus and links to your mega menu
A column with no settings can be used as a spacer
Link to your collections, sales and even external links
Add up to five columns
Add description, images, menus and links to your mega menu
A column with no settings can be used as a spacer
Link to your collections, sales and even external links
Add up to five columns
Add description, images, menus and links to your mega menu
A column with no settings can be used as a spacer
Link to your collections, sales and even external links
Add up to five columns
Add description, images, menus and links to your mega menu
A column with no settings can be used as a spacer
Link to your collections, sales and even external links
Add up to five columns
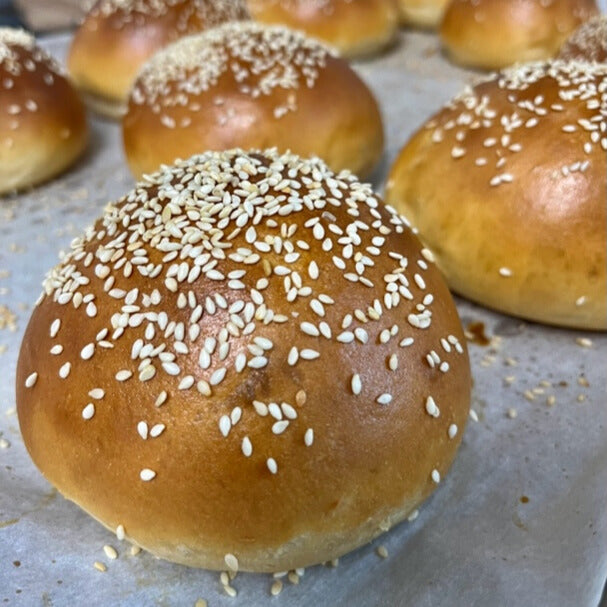

Tangzhong Burger Bun
May 04, 2023 4 min read
Tangzhong Burger Bun
Yield: 10 buns 95g each
**This is an overnight recipe
Download a printable version of the recipe here.
Tangzhong:
130g Whole Milk
Dough:
200g whole milk
28g sugar
8g Dry Active Yeast
40g milk powder
7g salt
1 large egg + 2 yolks
35g BSM Stardust whole wheat flour
72g butter (softened)
1 egg (for washing)
Baking instructions:
Tangzhong method:
In a small sauce pan, weigh your 130g of whole milk and 30g flour. Whisk out any lumps and continuously whisk over medium heat until it forms a thick paste. Set aside.
Dough method:
In a standup mixer, add the Tangzhong, 200g cold milk, and sugar. Whisk to dissolve and to allow the hot Tangzhong to cool from the cold milk. Add in the yeast and whisk to dissolve. Let stand for 15 min to allow the yeast to bloom. Add the eggs to the liquid mixture.
Measure both flours, milk powder, and salt in a separate bowl. Add dry ingredients to the yeasted liquid and switch to the dough hook for 15 min on medium-high speed. Scrape the sides of the bowl periodically to ensure all of the dry ingredients are incorporated. The dough will be sticky. Allow to rest for 10 min.
Add the butter half at a time while using the dough hook on medium speed. Once all the butter is added, continue on medium speed for 5 min. Do a windowpane test.
Turn dough out onto a floured work surface and knead by hand for 2 min until an elastic dough ball is formed. Add a little flour to your work surface if needed while kneading to prevent sticking.
Use a clear plastic container or bowl that is more than twice the size of the dough ball. Spray the container with pan spray to prevent sticking. Place the dough ball in the container and cover with plastic food wrap. The dough should double in size in the refrigerator overnight (8 hours or so) as this allows the dough a long cold bulk fermentation for the flour to fully hydrate.
(**Note: This can be made the same day: 2-2 ½ hours bulk ferment at room temperature or when doubled in size. For best results, a longer cold fermentation is recommended. A 75F room temp is best for the dough to rise properly. Remember, temperature is an ingredient in bread making!)
Remove dough from fridge and let stand for 15 min. On a lightly floured work surface, roll the dough into a short log. Using a bench knife, divide and weigh the dough into 95g dough balls. De-gas each dough ball by flattening out onto the work surface. Pinch and bring in the sides in an inward motion to form a ball. Put the ball seam side down and, in a circle motion with the palm of your hand, roll the dough into a tight smooth elastic ball. Use flour on the work surface and your hands if needed to prevent sticking. At this point each dough ball should ?
Place each shaped dough ball onto a parchment lined baking sheet. Take a large sheet of plastic food wrap and lightly spray with pan spray. Cover the sheet tray of dough loosely with the sprayed side down as this prevents sticking to the plastic. Allow the dough balls to do their final rise/proof for 2 ½ hours or so, depending on the temperature of the room. Always determine readiness based on the look of the dough and not the time. A rule of thumb to check for readiness: Gently press your index finger into the dough. If it springs back instantly, it needs more time to proof. If it holds an indention, it's ready to bake.
(**Note: If your kitchen tends to be cool, place the tray in your non-heated oven on the top rack without plastic, with a tray on the bottom rack filled with hot water. This will create a proofing environment. If you have a proofer setting on your oven, turn this setting on before placing the tray in the oven for a total of 2 hours to final proof. Be sure to remove plastic or simply do not cover at all if using an oven proofer setting! When checking for readiness, in the last 20 min of their final proof, remove the tray from the oven and preheat to 350F.)
Lightly beat the egg to make an egg wash and gently brush the tops and sides of the dough balls. Add poppy seeds or sesame seeds if desired at this time. Bake for 15-17 min, depending on your oven.
Cool on a cooling rack. Can be stored on the counter for 2 days or simply refrigerate to extend their shelf life. These can also be frozen for up to 2 weeks after completely cooled and tightly wrapped.